
Entering Grades in the ConnectCarolina Faculty Center for Staff
The ConnectCarolina Faculty Center enables faculty members to manage class and student-related activities from one centralized location.
Having Faculty access gives the ability to:
- Review class details
- Review student information
- Notify selected students or the entire class
Note: Visit the Registrar’s document repository for a complete explanation of entering grades in ConnectCarolina.
Accessing Your Grade Roster
- Log in to ConnectCarolina.
- From the Admin WorkCenter home page, click the Student Administration WorkCenter tile.
- Click the Teaching Resources link on the left menu.
- Click the Grade Roster link.
Assigning Student Grades
Important: There is a 60-minute time-out period during the grading period, and any unsaved data will be lost.
You may save a roster as many times as you wish. It is recommended that you save early and often.
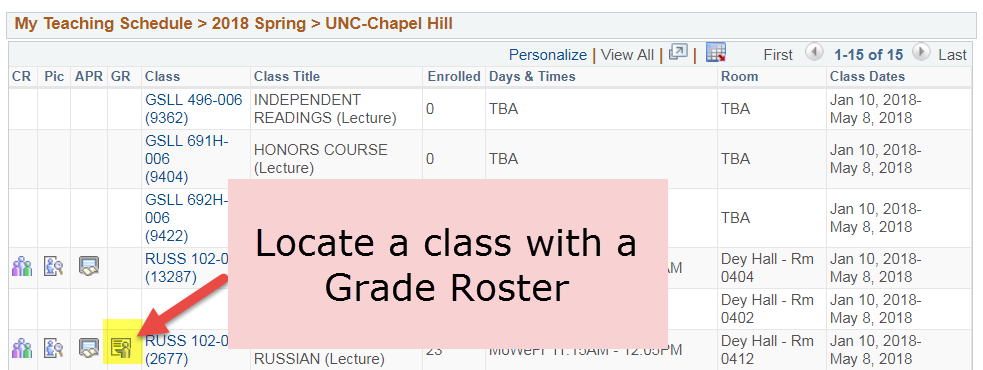
- Access Your Grade Roster by going to your Faculty Center >> My Schedule
- Click the Grade Roster icon for each course.
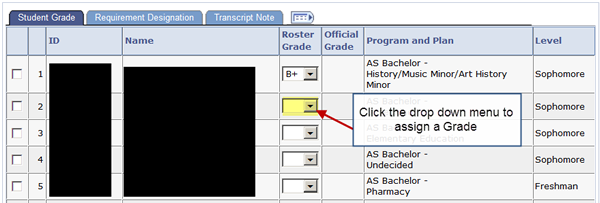
- Select the student’s grade from the Roster Grade drop down menu. Only valid values can be accepted in the roster grade box. The selected value will be displayed as the official grade after the roster has been posted.
- Click the Save button located at the bottom or top of the grade roster. You can save a Grade Roster as many times as necessary.
Note: Move slowly through the process as it is easy to enter an incorrect grade.
Changing Grades
Important: Each time you enter grades, you should save your work.
- You can return to the grade roster to add more grades and change erroneous grades. This can be done until the grades have been approved.
- If you plan on entering grades in multiple sessions, you may find it convenient to check the “Display Unassigned Roster Grades Only” box. This will display ONLY the students without grades assigned.
Setting the Approval Status of the Grade Roster
- When the grade roster is first generated, the approval status is set to “Not Reviewed”.
- Once all of the grades have been entered, the approval status can either be set to “Ready for Review” or “Approved”.
- If you do not approve grades, set the status to “Ready for Review”. This will indicate that grades have been entered and are ready for final review. The drop-down boxes for choosing grades will disappear.
- If you need to change a grade, you must set the approval status back to “Not Reviewed.”
- If you do approve grades, you will have the option of setting the approval status to “Approved”.
Important: Only set the approval status to “Approved” when the grades are ready to become official. Once you change the status to “Approved”, the drop-down boxes for changing grades will disappear. Once the official grades are posted, you will not be able to change the approval status or change grades through the faculty center.
Approve a Grade Roster
Follow these steps to approve a grade roster:
- In ‘Not Reviewed status, continue to add and update student grades.
- When finished entering grades for all student on the roster, select the appropriate approval status:
- For Teaching Assistants, select Ready for Review.
- For Instructors, select Approved.
- Click the Save button.
Have a question about Grades?
Contact the Registrar’s records team at: grades@unc.edu